
|
|
|
|
|
Welcome to Saab92x.com!
|
|
|
|

Your story sounds quite prescient, thank you for sharing. Absolutely agree that having too strong a clutch will simply make the rest of the driveline be the weakest link. As careful and relaxed as my normal shifting approach is, the power on tap will generate damaging shock loads during spirited shifts that in the past might not have been catastrophic.
For the time being, my thought is to wait and see, and when things break to reevaluate.
The 3.70 final drive on the 06 5 speed makes highway cruising nice, and having the extra shift on the 6 speed at lower speeds doesn't hold tremendous appeal as of yet. Launching and aggressive shifting are not part of my driving program, nor is trying to get more power.
As someone who has one (as well as any others who do and might chime in), does a 6 speed greatly enhance the driving experience on the street? Are there drawbacks? Is the main advantage being the peace of mind that one can shift aggressively without worrying about breaking things constantly, or is the ability to keep the revs in the powerband at lower speeds much more enjoyable in street driving?
At the moment, shifting close to red-line in first leaves me right at the power-band in second which goes out to >60 mph, so other than the pause to make the 1-2 shift carefully it's hard to imagine an extra gear making things substantially more fun...but perhaps something is lost on me.
Offline
Offline
Not many people would like to drive a 205 with a 20g. It is dead until 3500-4000 depending on the gear. My 2004 6 speed has the shorter 1-4 ratios, which means I shift a lot more, I get lowered fuel economy, !BUT! the car is a ton more lively simply because I can stay in the power band. I have a ton of excellent parts on my car, but this has to be the most transformative one yet. It needed to be for how much it cost.
You have a ton more torque having a 2.5 in the car, so I don't know if you would benefit from shorter gearing like I did, but if you get a chance, see if you can drive a local STi or even go for a ride in one to get an idea of what the driving experience is like.
Drawbacks are price and the zillion ways to do a 6 speed. You can do it as simple as finding a funny ratio r160 diff to keep everything else on the car, or a full sedan swap down to the control arms, brembos and 114.3 parts including suspension. I did an r180 and hybrid rear axles to stay 5x100. I have not wired DCCD in either, which means I cannot run on a dyno (uneven F/R split). I do not for a millisecond regret it. I wish I got a 2007+ gearset or even a LGT spec b, but that would have numbed the snappy gearing in exchange for fuel economy.
Good luck.
Last edited by Zee Biker (2015-12-12 15:06:53)
Offline
Wanted to share my opensource logging setup to demonstrate that a Cobb AP isn�t necessarily the best solution for everyone.
While the Cobb AP regime is pretty entrenched, and with flex-fuel support rolling out soon to be more so, there remain a number of cool things possible with a Tactrix open port that surpass what the AP can do at the moment.
For one, stand-alone logging is possible, which can be triggered on particular events of your choosing. Log files get saved to a microSD card (slot is to the left of the USB cable in picture below). 1GB is plenty, newer higher capacity sdxc cards don't seem to work.
This automatically logs whenever, ahem, things get more interesting. For me that�s when the throttle is at 60% or more. Other triggers are possible, as well as manual logging with triggering from the rear-defrost, but the automatic logging really enables set it and forget it operation.
The tractrix is equipped with a 2.5mm input jack (can be sourced on old cellphone headsets, for instance) which allows directly connecting and logging an RS232 output, such as from my AEM wideband. The AP cannot do this elegantly at the moment (hacking into the rear o2 is the only way afaik).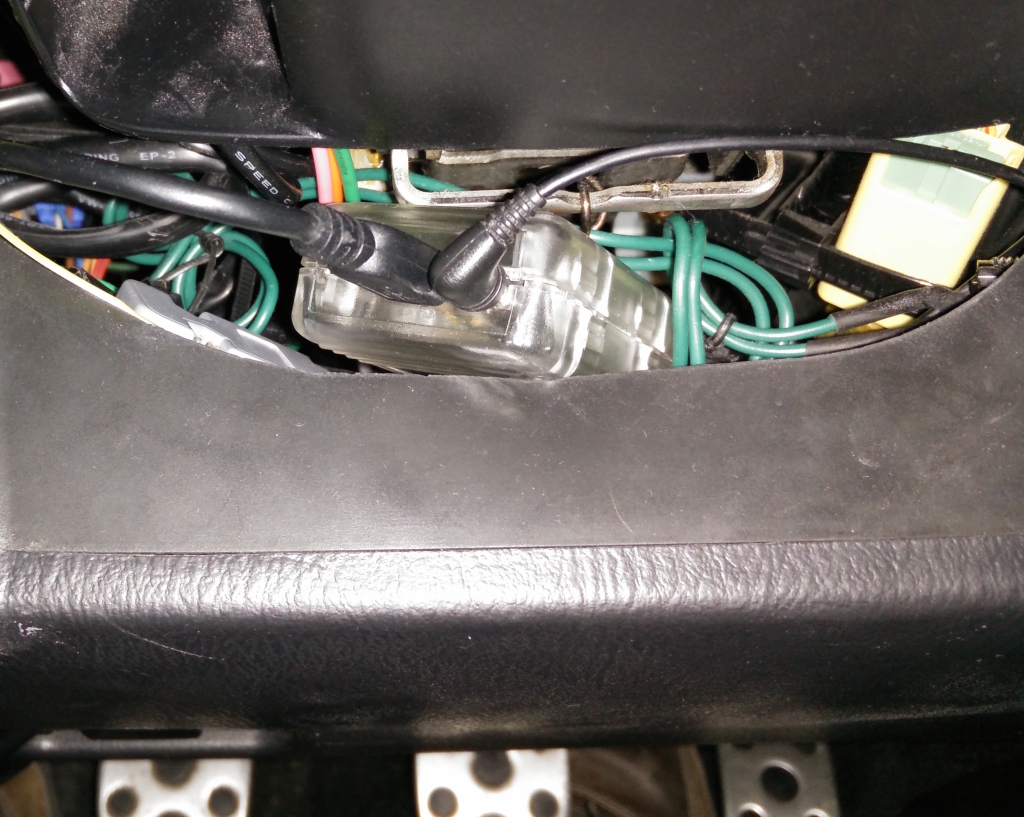
This allows automatic logging of relevant knock, fueling, and boost parameters, along with other things of interest in easily readable CSV files. With an android phone with on the go (OTG) capability and adapter these files can be easily accessed and read (a laptop works too).
Moreover, for the android platform, the app BtSsm (BtSsm) has recently been released which allows real-time parameter viewing and logging, along with learning-view snap-shot and CEL code reading. It works nicely with the open port and OTG adapter too. The developer is very responsive to new feature requests (such as compatibility with standalone logging, recently added), and the app has some pretty neat features. Below is a screenshot from running it recently: 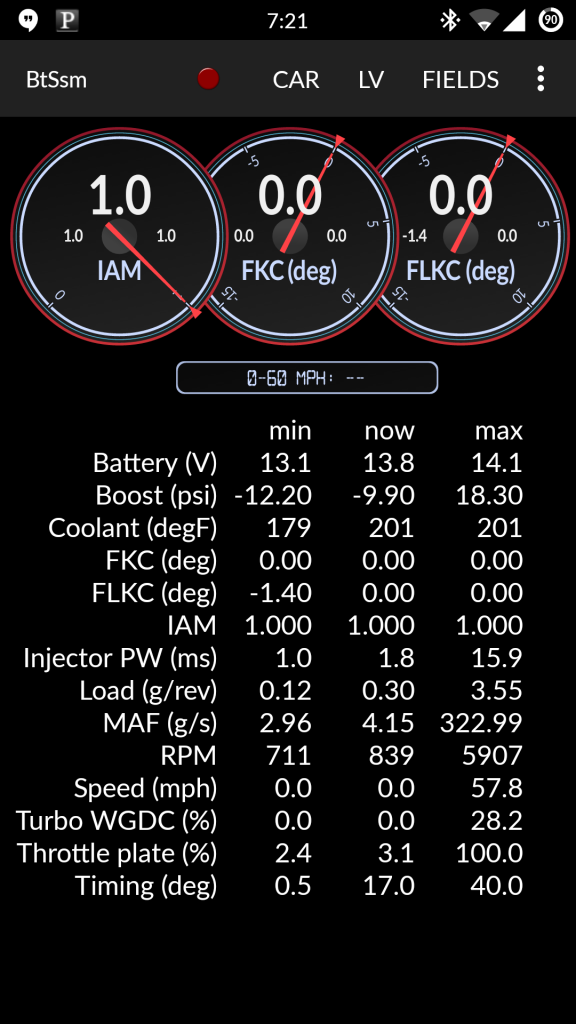
To flash maps still requires a computer running ecuflash software, so for folks regularly needing to swap tunes (i.e. for different fueling availability) an AP is handy. For real tuning, a laptop is most likely best anyway.
Personally, this is the ideal logging setup for monitoring things as much or little at any moment as desired.
Below is the text of the config file for my setup, saved in plain text on the root of the sd card as �logfile.cfg�. This is pieced together from various places and will be different for different ECUs (this is for an 06 5MT), but the general idea remains the same. The wideband parameter needs to be first for some reason.
Good resources for finding the correct for parameters many ECUs is:
http://subaru.hunterjm.com/
http://www.verticaltier.net/configtool/logger.php (no longer active sadly)
The upshot of this is that most functionality of the Cobb AP can be replicated using the tractrix open port, in addition to doing things the AP cannot.
;----------------aem----------------
; the "ascii" channel type can listen on any protocol for incoming numeric text
; the default protocolid is 9, which corresponds to the 3/32" jack receive-only serial port
; the default baud rate and setting are 9600,N,8,1. all of these can be changed for other scenarios

; the ascii channel considers anything other than the characters {'0'-'9','+','-','.','E','e'} to be a
; delimiter between different numbers. furthermore, the carriage return and line feed characters are
; considered to mark the beginning of a new row of data. you can sample data from a particular column of
; numbers by choosing a paramid starting at 1 which indicates the column number

; in the case of the AEM UEGO, there is simply one column of data, and it is already scaled appropriately

;----------------aem----------------

type=ascii
paramname = WIDEBAND
paramid = 1

; sample logging configuration file for openport 2.0
; must be named logcfg.txt and be placed in the root directory of the
; microSD card inserted in the openport in order to work

; this sample logs using the SSM protocol over the K-line, which works
; for both CAN-based and older Subarus

; this particular example is simplified to show the use of Subaru K-line logging
; along with the serial output of the AEM UEGO gauge unit (which is RS-232)
; the gauge can be connected by wiring the gauge RS-232 TX and ground signals to the
; ring and sleeve terminals of a 3/32" stereo plug which can then be plugged into
; the OP2.
;----------------ssm----------------

type=ssmk

paramname = Throttle_Opening_Angle
paramid = 0x000015
databits = 8
scalingrpn = x,100,*,255,/
sampgroup = 1

paramname = Engine_Load_(Relative)
paramid = 0x000007
databits = 8
scalingrpn = x,100,*,255,/

paramname = Engine_Speed
paramid = 0x00000E
databits = 16
scalingrpn = x,4,/

paramname = Atmospheric_Pressure
paramid = 0x000023
databits = 8
scalingrpn = x,37,*,255,/

paramname = Manifold_Absolute_Pressure_(2-byte)**
paramid = 0xFF6B52
databits = 16
scalingrpn = x,0.01933677,*

paramname = Boost_Pressure_actual
paramid = 0x00000D
databits = 8
scalingrpn = x,37,*,255,/

paramname = Primary_Wastegate_Duty_Cycle
paramid = 0x000030
databits = 8
scalingrpn = x,100,*,255,/

paramname = Feedback_Knock_Correction_(1-byte)**
paramid = 0xFF6B6C
databits = 8
scalingrpn = x,.3515625,*,45,-

paramname = Fine_Learning_Knock_Correction_(1-byte)**
paramid = 0xFF6B6F
databits = 8
scalingrpn = x,.3515625,*,45,-

paramname = IAM_(1-byte)**
paramid = 0xFF6B71
databits = 8
scalingrpn = x,.0625,*

paramname = Intake_Air_Temperature
paramid = 0x000012
databits = 8
scalingrpn = 32,9,x,40,-,*,5,/,+
sampgroup = 1

paramname = Mass_Airflow
paramid = 0x000013
databits = 16
scalingrpn = x,100,/

paramname = CoolantTemp
paramid = 0x000008
databits = 8
scalingrpn = 32,9,x,40,-,*,5,/,+

;-------------triggers---------------
;Uncomment this section to enable logging with defrost button, comment section below with throttle position trigger
;paramname = defogger_sw
;paramid = 0x000064
;databits = 1
;offsetbits = 5
;isvisible = 0

;conditionrpn = defogger_sw,1,==
;action = start

;conditionrpn = defogger_sw,0,==
;action = stop

conditionrpn = Throttle_Opening_Angle,60,>
action = start

conditionrpn = Throttle_Opening_Angle,60,<
action = stop
Last edited by countriccati (2017-07-09 16:16:36)
Offline
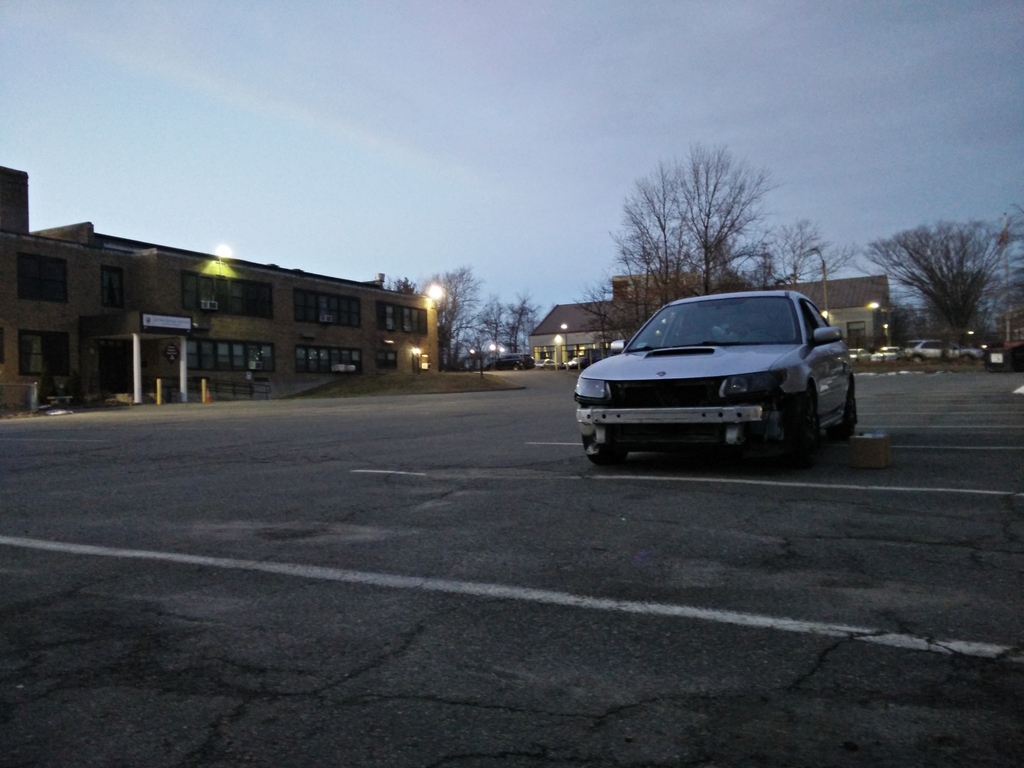
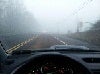
Snow threatened to make a starring appearance in Boston, so the WS70 Blizzaks came out for the show.
This was my first experience with plasti-dip. Ehhh. Gives a chance to try things out temporarily, but also managed to wear away already somewhat despite 4 coats. Initially the wheels didn�t leave me thrilled, but after a few days decided they are decent.
Interesting to find OEM 2013 Legacy 17x7.5 wheels are made in the USA by Enkei. By my bathroom scale they also weighed nearly the same as the V7s with similar tires on both. The more you know.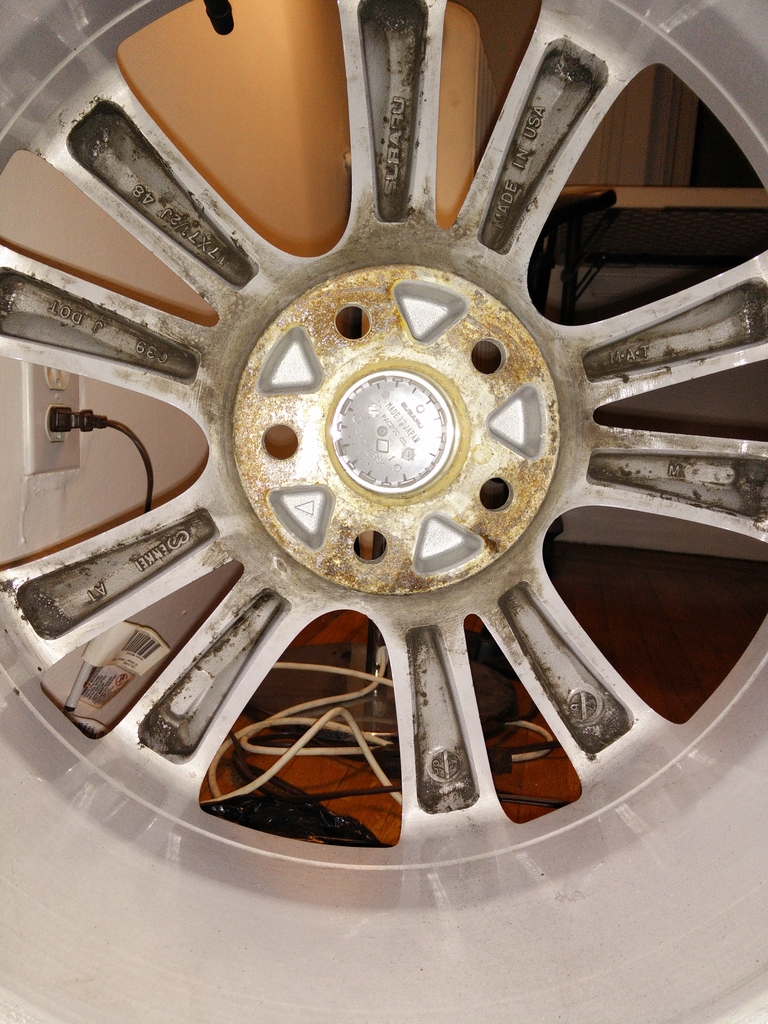
Was glad to have the snows on a trip out to Western MA to pick up some parts for possible future projects/spares.
This happened on the ride home. Now the fun really beings since the 6th odometer digit is confirmed to be working properly.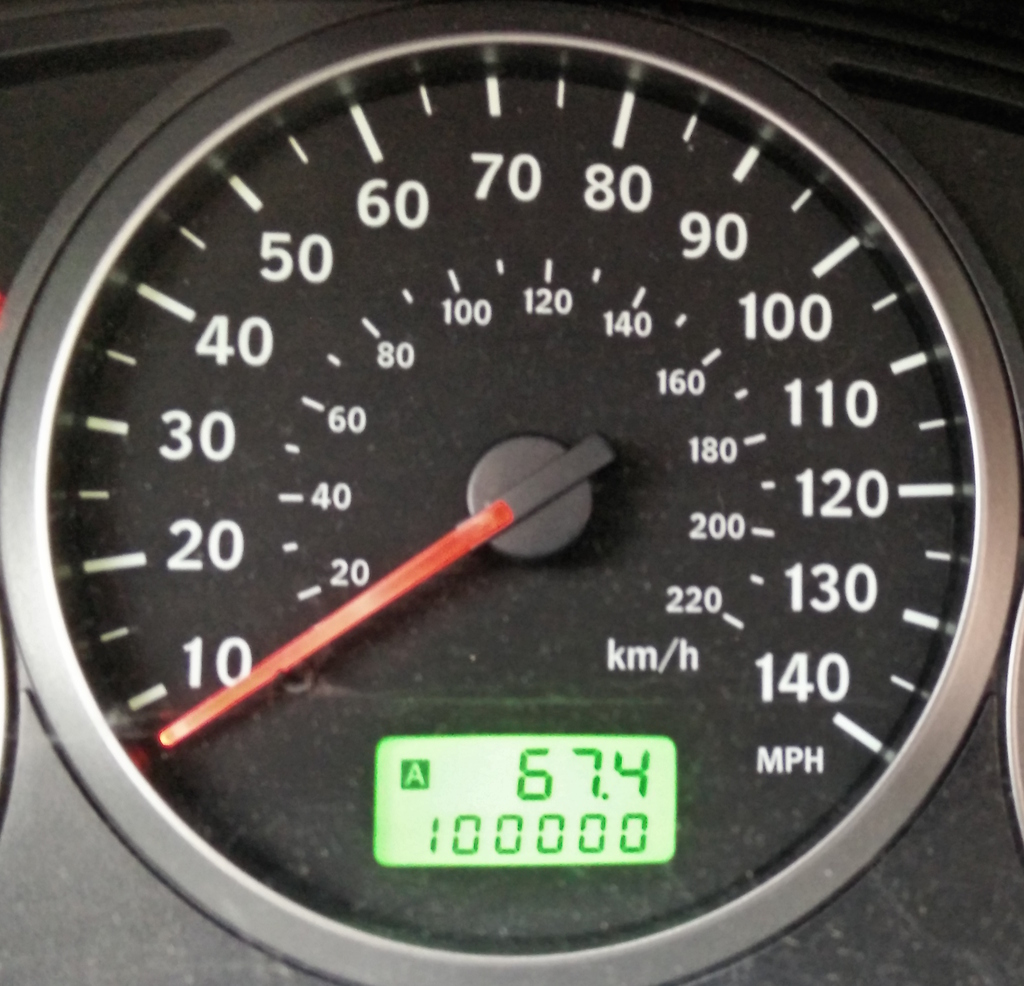
Last edited by countriccati (2017-07-09 16:15:09)
Offline

Don't know about the 16" wheels, but the OEM 17" Aero wheels are also Enkei
Offline

Nice stash, jelly for you.
Offline

Car looks great! I really like those wheels in black actually. I'm close to rolling over 100k as well. Oh joy. ha.
Offline

iamchris wrote:
Were the BBS RKs a factory option?
I believe so.
Offline

iamchris wrote:
Were the BBS RKs a factory option?
Technically, no. Dealer option. And thanks to the tremendous popularity of both the cars and the option, a bargain option at that (many got them as extra wheels for ~$125 or less a wheel new OTD)
Offline

drewsro wrote:
Don't know about the 16" wheels, but the OEM 17" Aero wheels are also Enkei
The 16's are also.
Offline
ikbrown wrote:
Car looks great! I really like those wheels in black actually. I'm close to rolling over 100k as well. Oh joy. ha.
Thanks for the kind words. My thinking is blacking out the chrome tri-pieces (and possibly headlights somewhat) might make the look a bit more cohesive. Originally planned to dip the wheels the OEM-style bright aluminum metalizer, but the base coats of black seemed worth a try for a bit first. Going over 100k is really freeing, more likely to just go out and drive it for no particular reason than before...
Rodman wrote:
Nice stash, jelly for you.
Thanks. It's not quite having a handful of EJ207s knocking around, but it'll do for my storage capacity (kitchen and/or living room in a 1-bedroom apartment).
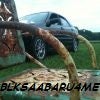
It seems like as more cars get taken off the road (surpassing the 10 year mark for financing, driving prices down, hence more totaling) part-outs are more frequent and reasonably priced.
Does anyone know roughly what percentage of all 9-2x's were equipped with factory HIDs? As in, how rare are the assemblies?
Scargo wrote:
iamchris wrote:
Were the BBS RKs a factory option?
Technically, no. Dealer option. And thanks to the tremendous popularity of both the cars and the option, a bargain option at that (many got them as extra wheels for ~$125 or less a wheel new OTD)
Dealer option is my understanding as well. The 5x100 RKs were offered in 17x7 +48 and do not clear STi Brembos, though apparently some 5x114.3 17x8 do (offset unknown).
The V7s, afaik, were an OEM wheel never offered in North America. Fitting for a car only sold in North America.
Last edited by countriccati (2016-01-26 21:32:36)
Offline
Agreed, it's time to buy as many spares as possible.
Offline
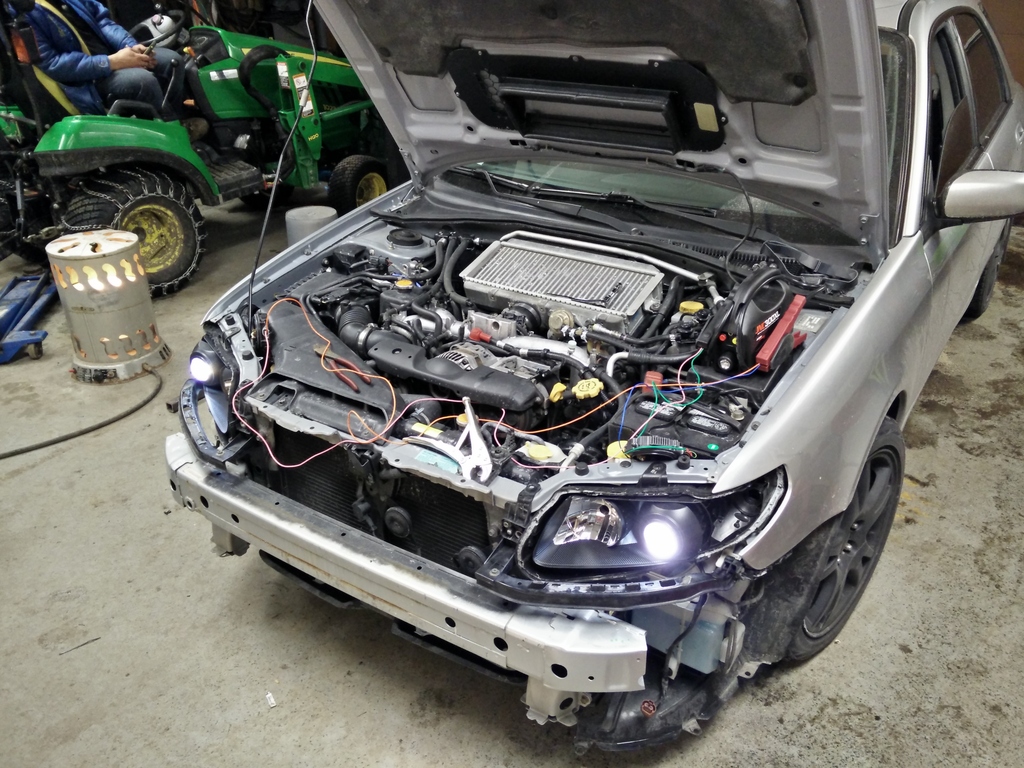
Having picked up a spare set of headlights it made sense to dig out the AP2 S2000 projectors sitting in the back of my closet picked up over a year ago for a different project.
After getting a quote from Caesar at Lightwerkz for doing the whole project that was well beyond my budget, figured why not take a stab in the dark at it. Incidentally, Caesar is a great guy who gave a lot of helpful support during multiple stages of the project, and he�s my go-to for all retrofit parts.
Bradrc�s writeup is good and was helpful a number of times. Some things made sense to do differently for my application, some are more matters of choice.
My goal was a subtle, factory looking setup based around the S2000 projector.
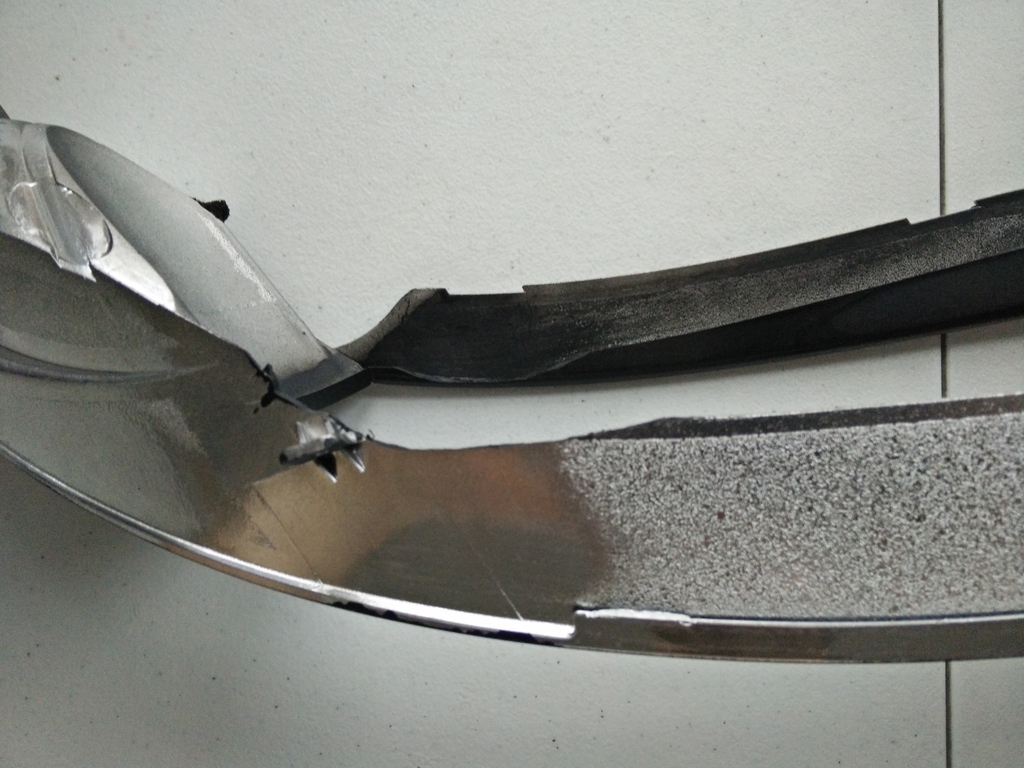
While the S2000 is one of the smaller OEM projectors, it�s substantially wider than the mini H1s, making fitment more of an issue. Also, the S2000s come attached to a large metal bracket that has to be �trimmed�. The term �trim� doesn�t fully capture what�s involved. You have to cut the heck out of these things to make them fit. You think you�ve trimmed enough�only to find you didn�t. In the end the bottom screw hole connecting the two parts of the projector had to be cut off completely, and the top one trimmed substantially as well. The end result is having three attachment/mounting screws, one on top, and two on the sides drilling through the original tabs.
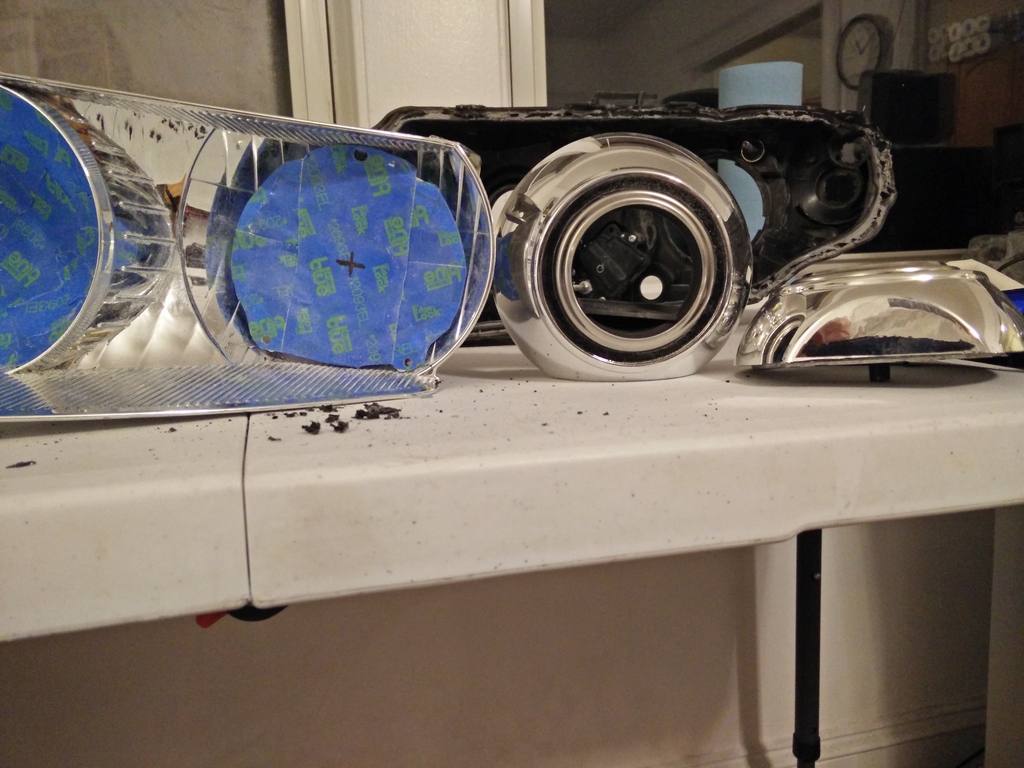
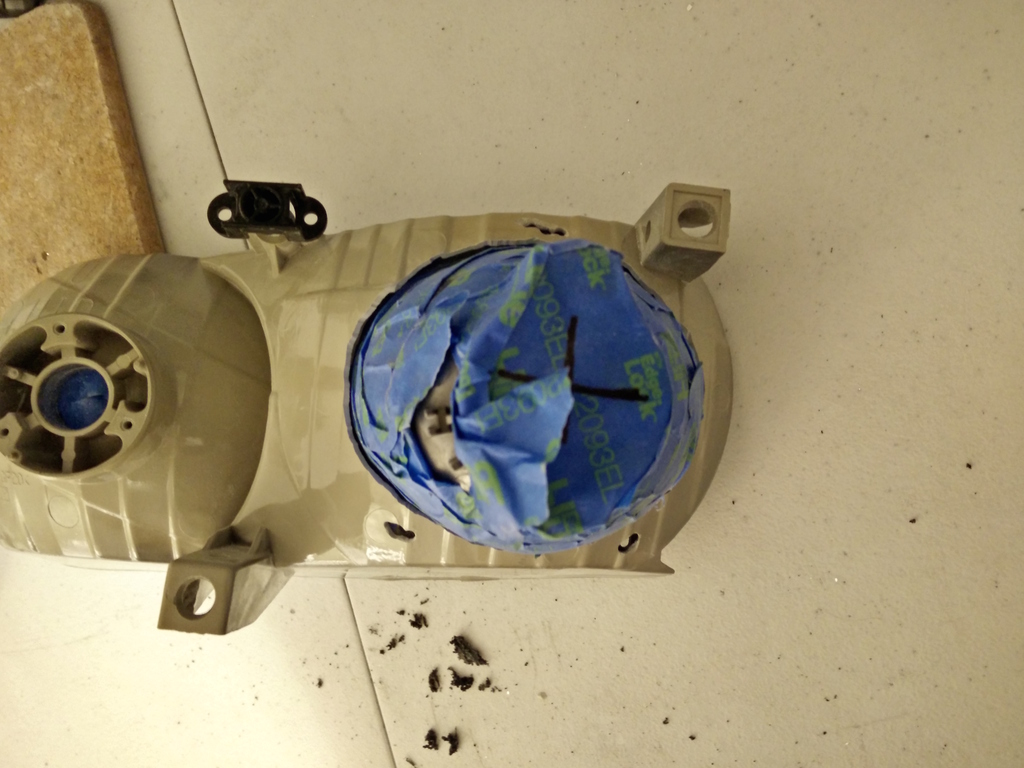
Screws were used to precisely space the projectors, as well as enable rotational adjustment before final epoxying. 6-32 screws worked well, using 3� long ones for the top mounting point and 2� for the two lower mounting points on each projector.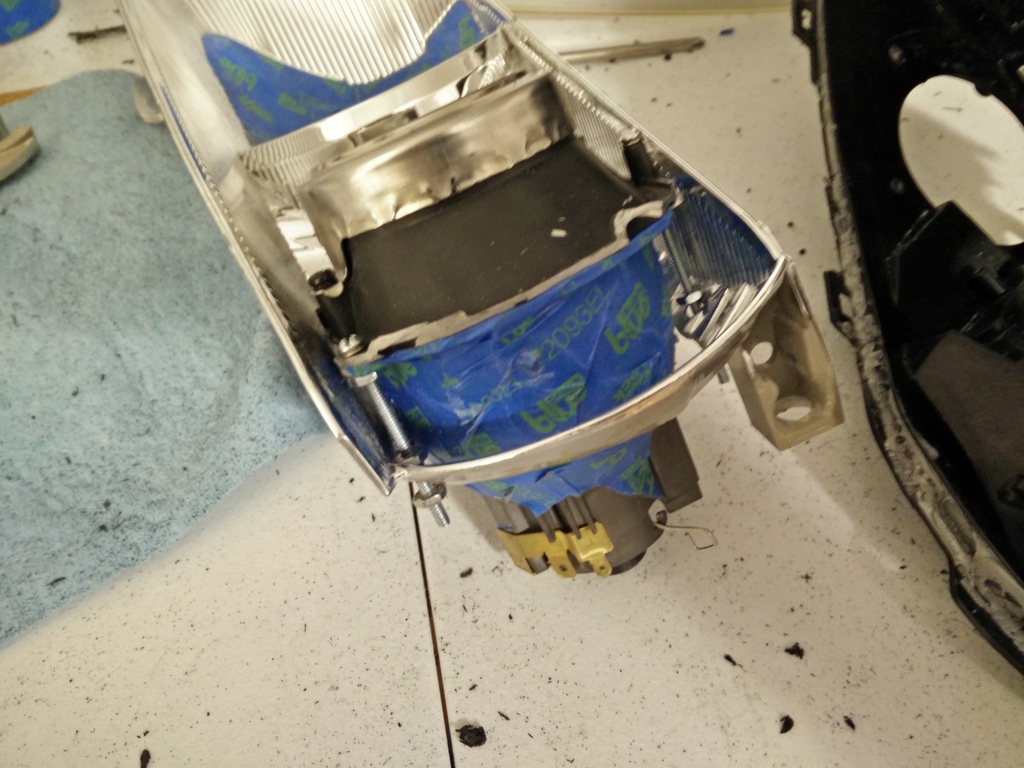
Front-to-back spacing was another major challenge. The plan was to mount the projectors deeper in, but the location of the battery made that impossible.
The goal was to enable a full range of motion using the factory vertical and horizontal adjusters, especially since leveling switch functionality was important to maintain (both the car and the spare set are factory HIDs).
This meant adjusting the headlights to the full left/right and down position and then measuring for spacing in the back, and then the reverse for spacing in the front.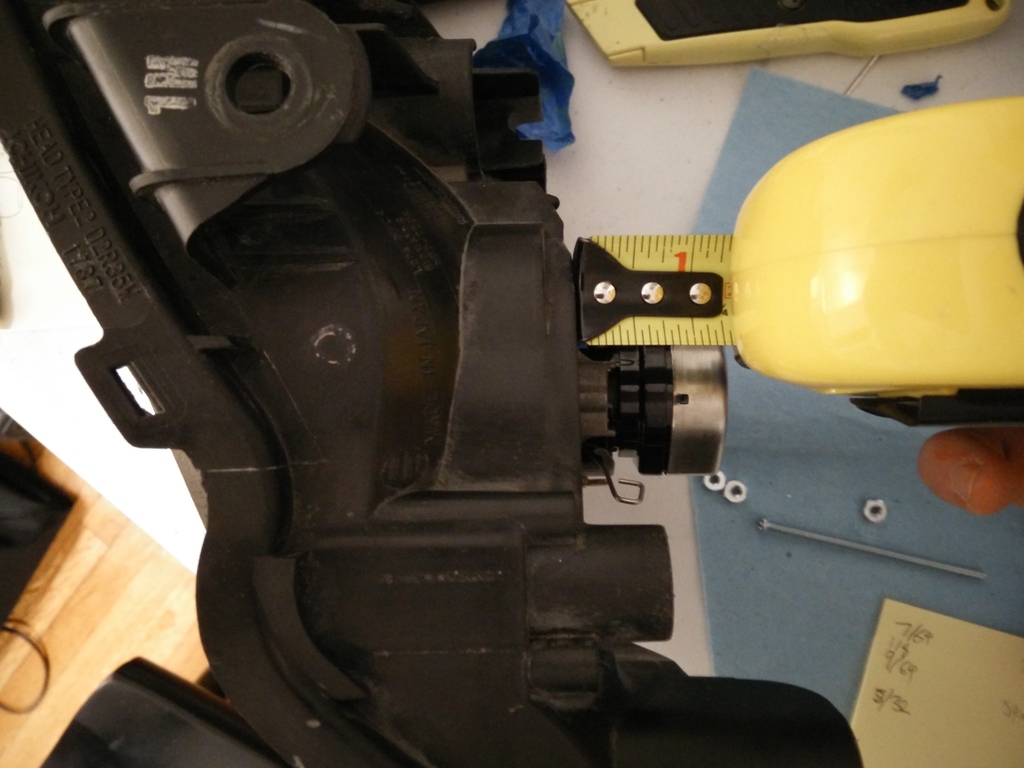
The shrouds are the Iris type, and their shape required trimming down the front headlight trim to ensure full range of adjustment.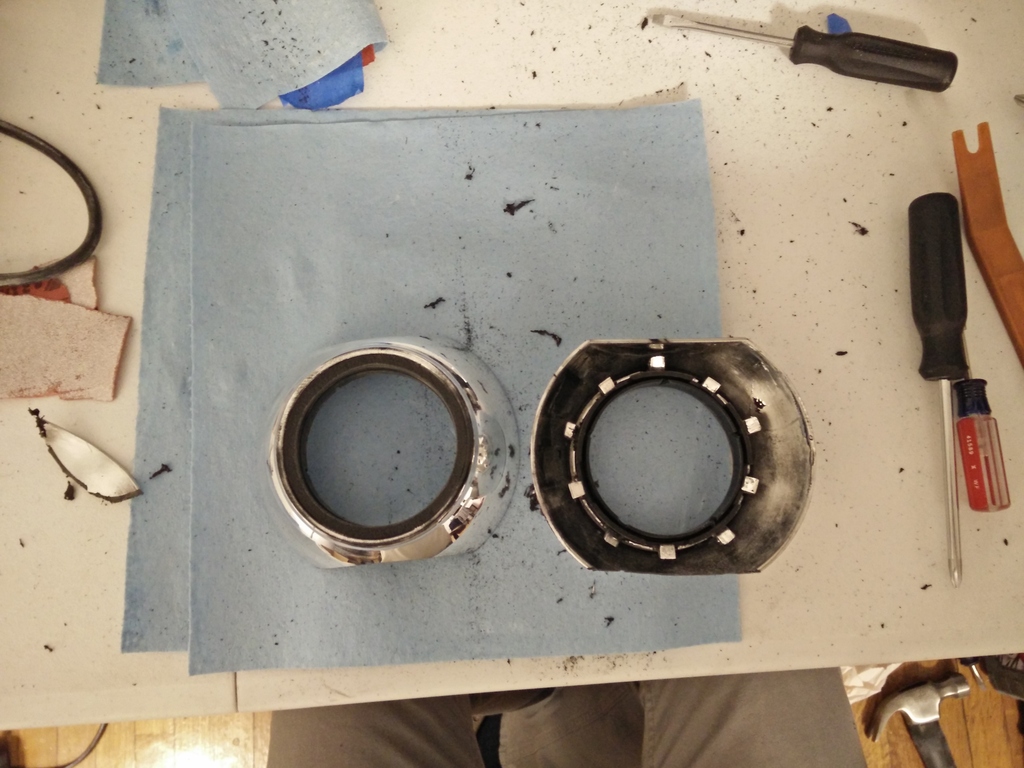
The original plan of leaving some of the turn signal chrome just didn�t look the greatest, so it was blacked out subsequently.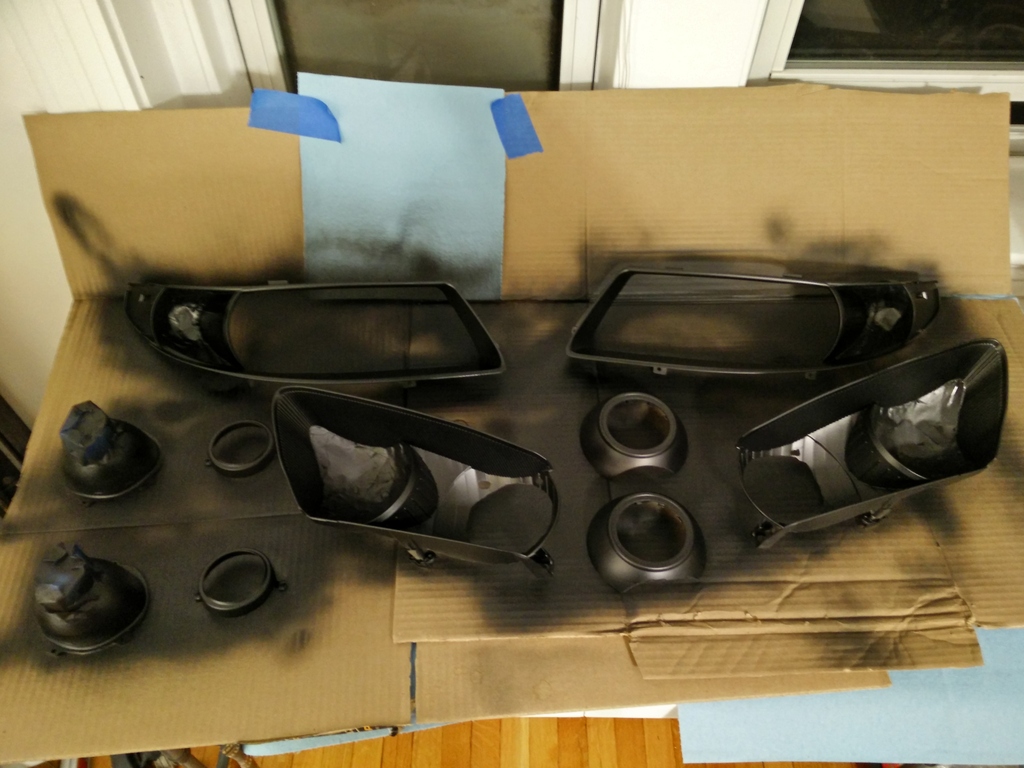
Everything was then reassembled and tested at a friend's garage up in NH before epoxying and resealing to make sure things looked rotationally correct. 
To seal up the backs the 90mm squishy caps from Lightwerkz worked perfectly, sealed to the housing using RTV silicone.
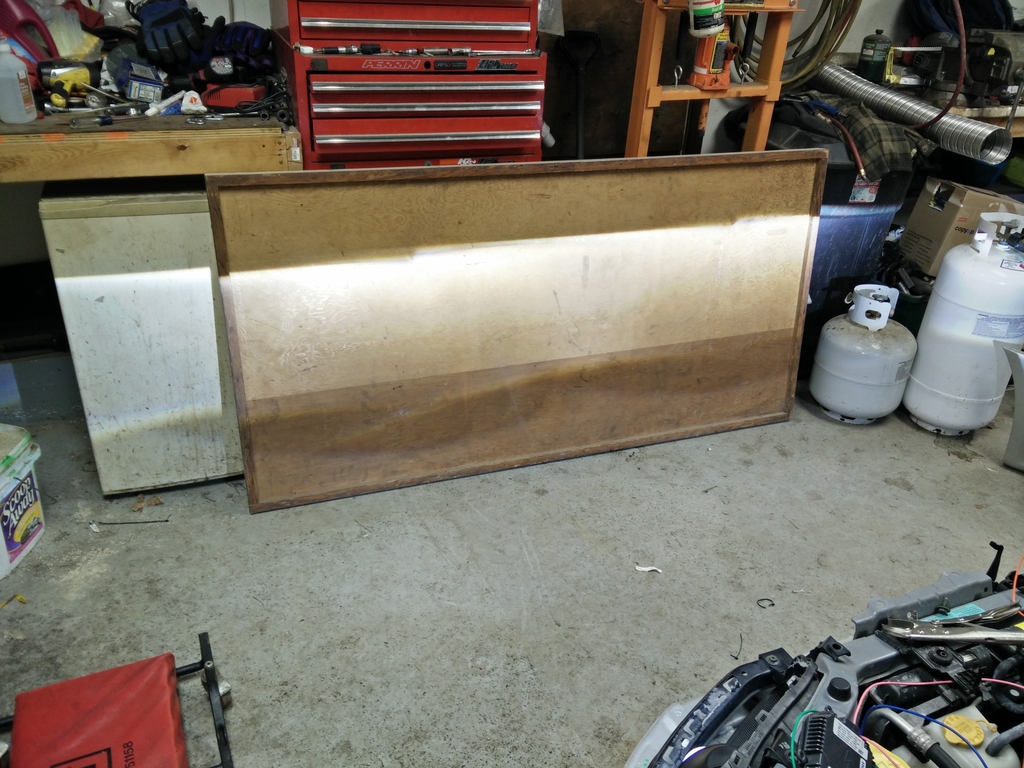
The lenses on the spare set were in pretty rough shape, so, despite the additional work, it made sense to swap the lenses from my current headlights on. This meant doubling the total number of baking steps for the project, and needing to do the install at/near my apartment so everything could be baked and properly disassembled/reassembled. A small amount of additional gray morimoto butyl from Lightwerkz was used for resealing. The small oven in my apartment just barely fits a single housing at a time.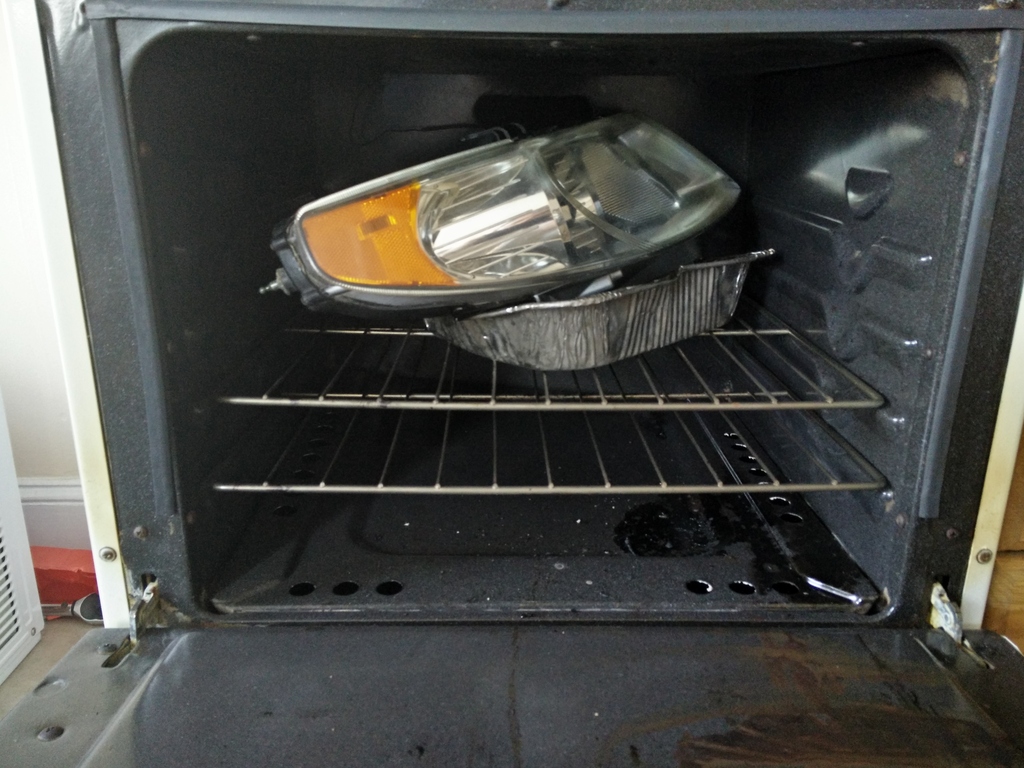
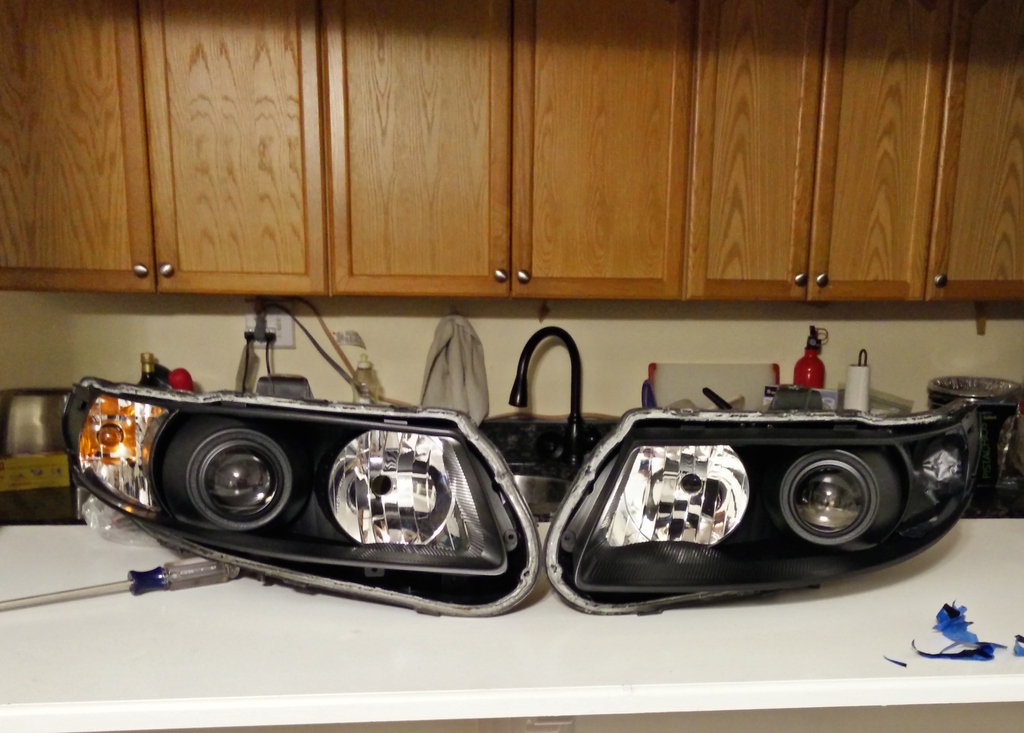
Not having a garage or good place to aim the lights nearby meant doing everything in the lot behind my building and then driving with no bumper to another parking lot nearby with a suitable "wall" (the front bumper fits in the car!) We got 50 degree weather as a treat over the the weekend, making the install possible...much nicer than the -5 we had the previous weekend.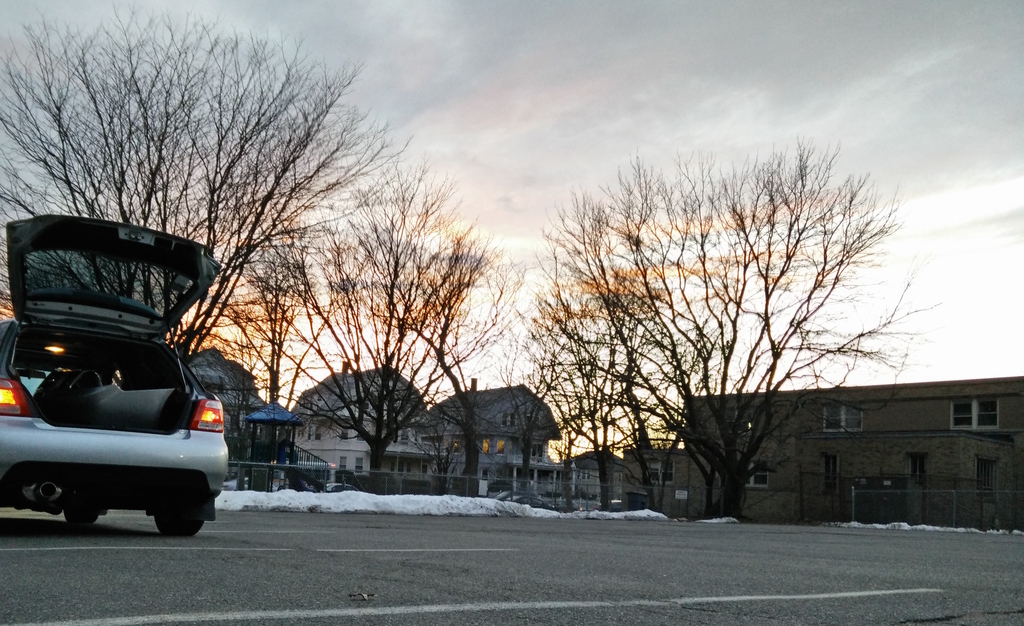
My photographer friend helped buff the lenses to look much better than before, and also took some pictures. Feel free to ignore the dirtiness of the car.
The S2000 projectors have a great beam pattern (much wider than the pic shown here), the factory level switch still works properly, and things came out about as well as you could hope for a first-time retrofit. This took an enormous amount of time, but the result is worth it to me.
Last edited by countriccati (2017-07-09 16:11:55)
Offline
While the projectors still aren't my jam, I think your retrofit is the best looking one I've seen done. I can respect the amount of time that went into that, and obviously they function a ton better than the stock ones do. 
Offline
I am still pretty fearful myself of tackling this with getting them baked just right. I would have a feeling mine would leak 
But I concur with Ikbrown, definitely one of cleanest jobs. Well done!
 Aero Winter Beater
 Offline
I did a Morimoto projector retrofit on my bug eye, its a good amount of work. The factory HID on my aero are still much better.
What are you doing with the oem HID headlights you recently purchased ?
I have a crack on my driver side lens
Your car is looking good, congrats man.
Offline
Thanks all for the kind words. We're in the middle of a huge rain storm in MA right now, things seem to be holding up well so far.
Rodman wrote:
I did a Morimoto projector retrofit on my bug eye, its a good amount of work. The factory HID on my aero are still much better.
What are you doing with the oem HID headlights you recently purchased ?
I have a crack on my driver side lens
Your car is looking good, congrats man.
The amount of light from these headlights is unbelievable. Will try to take some pics of them once it's warmer/not raining out, but they work amazingly well. No clear plans yet on my now spare set of HID headlights. Probably will keep them for a bit to make sure there are no issues with the new setup.
Offline
The projectors definitely change the look of the front of the car. I don't know how to explain it but it looks more like a saab now than a saab'd up wrx.
Great job on the whole project, definitely not for the faint of heart.
I wish you were closer, I want a ride in your car to see how much faster it is than mine. 
Offline
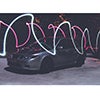
They look great, and I agree with ^^ about it looking more like a saab -
Paired with the still-chrome grille it looks awesome
Offline
Agreed about the looking more like a Saab. My inspiration was exactly the 2008+ 9-3 (hence originally planning to leave the turn signal chrome).
At some point was considering trying a quad retrofit to look like the 9-5, but Caesar at Lightwerkz convinced me that was biting off more than made sense for a first time retrofit, would just double the work and distract for main goal (he was totally right).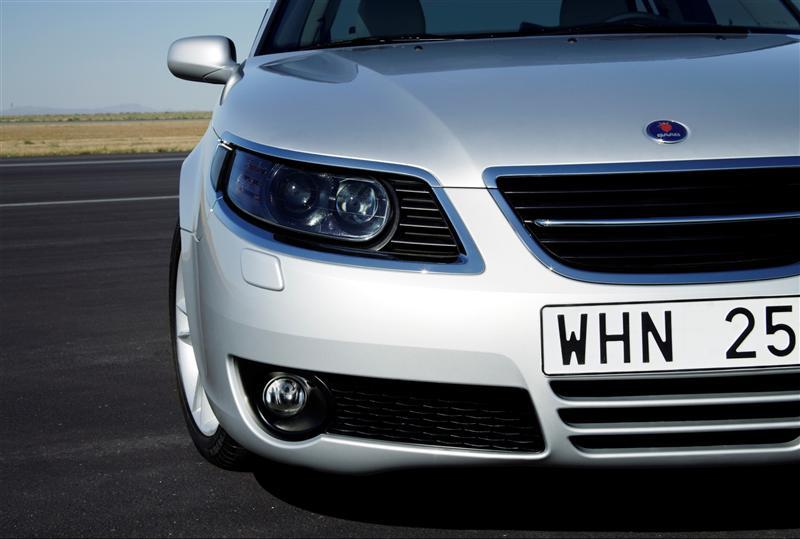
The 9-5 looks like it's headlights are themselves the sides of the tri-piece grille which is pretty neat.
At this point what's less clear to me is whether to black out any/all of my chrome tri-pieces or leave them as is. Plasti-dip (on the wheels) was not a lovely experience but maybe when things warm up it'll be a thing to try.
Last edited by countriccati (2017-07-09 15:59:38)
Offline
Finally got a chance to take some pics of the headlight output in against a wall in near darkness. The beam is super wide, which is amazing on the road. The S2000 projectors stock cutoffs bow down a bit on the sides, and it seems like when trying to align the middle parts correctly from close range they ended up being slightly off from one another. Really not a big deal, Caesar at Lightwerkz confirmed from this pic they may be slightly off but said they're completely acceptable, so with that endorsement it's done! We also got a major rain storm last week and everything seems to be fine, which is great.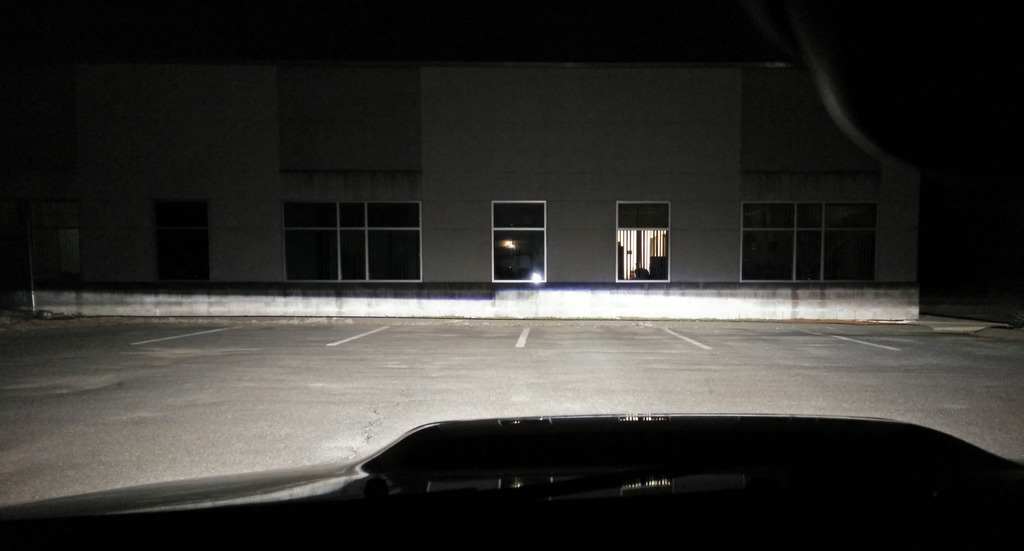
Tackled some much more minor lighting issues, specifically the cluster and head unit.
Right when the car turned over 100k the outside temp light suddenly went dark, and the cruise indicator light had been missing too.
The problem with our clusters is they have color coatings on the inside which assume light from incandescent/tungsten bulbs.
The cluster takes 14 74 size bulbs, with the ones for illuminating the speedo and tach having larger heads to light more area (numbers 1, 2, 5 in the diagram).
Replacing these bulbs with LEDs thus has a number of issues:
1) Light dispersion. Single LEDs have relatively narrow light dispersion angles (around 90-120 degrees typically)
2) Color. Warm white (around 4300k) is the correct color to make things looks as designed, using other colors results in things looking strange.
3) Voltage drop. LEDs have less drop than incandescent bulbs, so when every bulb was replaced with LEDs the "BRAKE" light would remain illuminated all the time, just more dimly when the brake was disengaged.
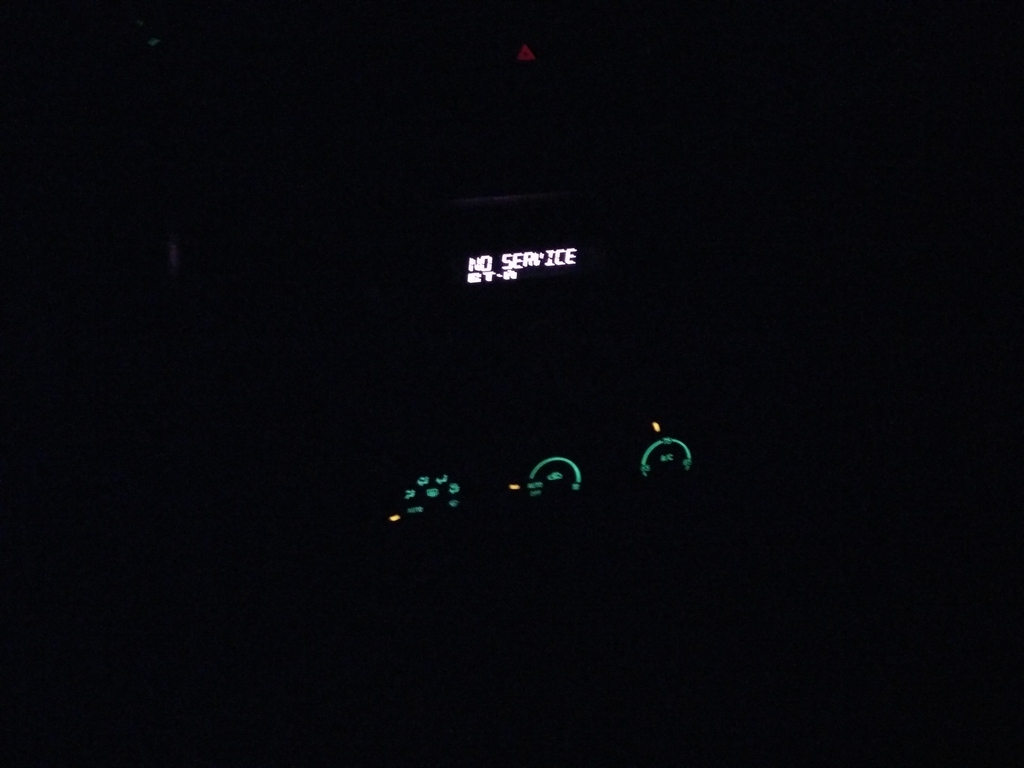
In the end, this is the combination of bulbs that worked for me. The pictures don't fully do them justice since it's in the dark, but give a general idea.
To solve problems (1) and (2) for the speedo, tach, temp and fuel lights, 5 of these type of LEDs worked perfectly: 74-WWHP3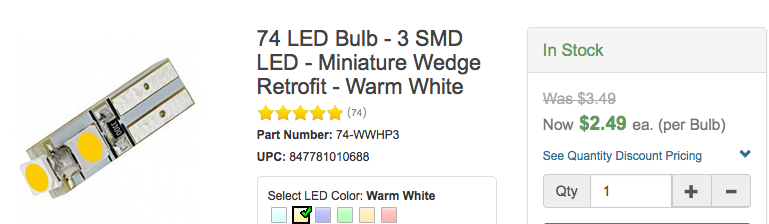
They have 3 LEDs packed into one 74 base, and the color warm white is exactly right for replicating incandescent bulbs. If money was no object, ordering 13 of them would be the perfect thing to do: good color and light dispersion (why only 13 will explain later).
The problem is those are quite pricey compared to the simpler single LED options out there, and for just illuminating a "CRUISE" indicator, for instance, it seems like overkill.
These yellow LEDs seemed like a good budget option to try for the rest. 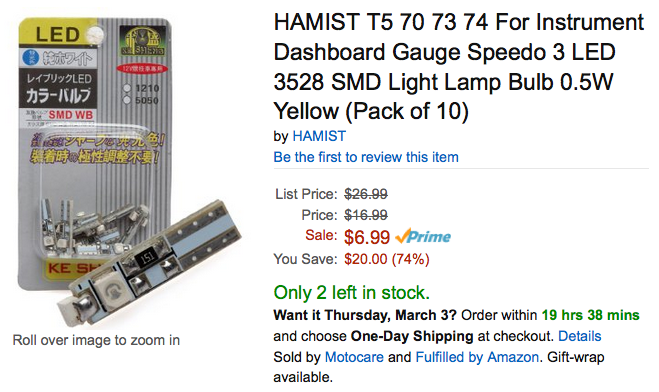
Even though they have 3 LEDs they are much too dim to work for the speedo. Get what you pay for here. Also they were TOO yellow in some places, and gave a jaundiced feeling to the turn signals and LCD displays. Yuck.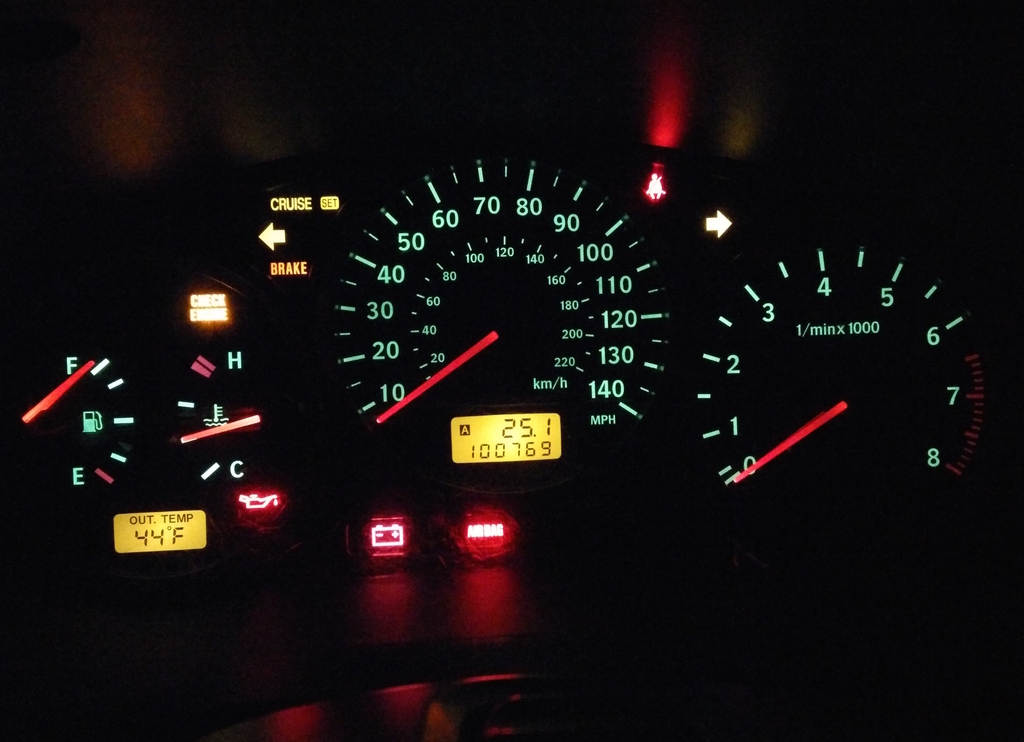
4 of these bulbs (originally purchased with the first kind) were then used instead for the turn signals and LCDs: 74-W.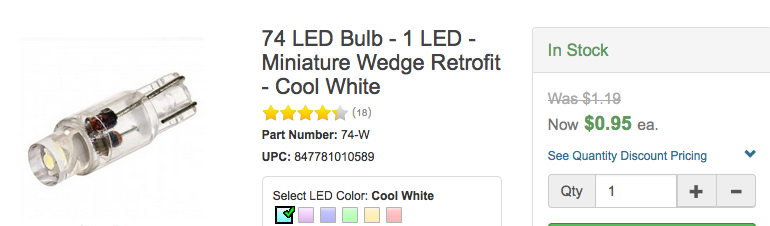
These bulbs would turn the "BRAKE" light purple, so the yellow ones above were left in, and though the LCD displays look blindingly bright in the picture below they really are MUCH better than the gross yellow in real life and are not blinding at all. They do have hotspots, which is why ideally getting another 2 of the more expensive warm white ones would be best.
To solve problem 3, the only solution was to leave an incandescent bulb in the location for the charge light indicator (13 in the diagram above). This causes enough voltage drop across the BRAKE light to fully turn off when the brake is off.
Another annoyance in the car was the head-unit. It's an aftermarket Pioneer FH-X700BT, which functions wonderfully for connecting to my phone's bluetooth. The problems with it were:
1) One of the speakers seemed to occasionally go out occasionally
2) The factory under-seat sub wasn't working
3) The amount of light from the head unit was way too much at all times and wouldn't dim with the factory dim switch.
Problems 1 and 2 were easily dealt with by fixing some shoddy/ignorant wiring from previous owner(s). Shudders.
Problem 3 was more tricky. The headunit didn't have a wire to attach to the factory dimmer switch, relying on some little sensor to determine lighting that didn't seem to do very much. It's style also doesn't match the car with all the bright flashy lights, and no amount of changing its button colors made it fit in better. It looks best when turned off. For my purposes, only the big volume dial and next button are ever really used, and are easily located without any lighting. Thus, it made sense to try to black out everything other than the screen.
This wasn't the final taping off pattern, needed to put more around the LCD display since it bled light in all directions, but this was the general gist--covering everything with electrical tape. All the buttons still work fine, it's completely reversible if need be, and no more annoying light in the dark, while still being completely usable having learned where all the buttons needed for my purposes are.
At some point a unit with a screen will probably make sense, but for now the head unit looks much less garish, and no longer distracts at night.
Last edited by countriccati (2017-07-09 15:58:37)
Offline
The orange/yellowish dash light makes me laugh.
I saw... civic? the other day.. maybe it was a Mazda... oh well, it was kinda modified (it passed me on the freeway) and it had beautifully well done incredibly white and bright lights that lit up the entire 5 lane freeway. I loved it. And they were installed correctly too, so they were leveled right. It looked so sweet. How are the corners on the ground of your beams? Do they jut off immediately or do they fade off on the sides
Offline
Yep, the yellow was super gross. A little orange for the brake light was better than purple, it's annoying how hard it is to find correct warm-white colored LEDs at a reasonable price...most people probably want to change the color of their cluster perhaps so less demand for warm-white?
Yep, mine light up both sides of a 5 lane freeway now regardless of what lane my car is in, while staying below the rear-windows of other cars ahead of me since they're leveled right...it's amazing! Caesar told me far too many DIY jobs end up with them way off, and reassured me mine are just fine (thankfully!). Seeing the way the cutoff reflects on license plates/streets signs up ahead is fun too, gives it a little bluish glow.
Not sure what you're asking about the corners on the ground...if the wall were longer the light would slowly fade on both sides of that picture. Driving on the road have yet to encounter a scenario where it was wide enough to actually see that happen, on a freeway just can see the light along both side barriers.
Last edited by countriccati (2016-03-02 01:00:39)
Offline
countriccati wrote:
Yep, the yellow was super gross. A little orange for the brake light was better than purple, it's annoying how hard it is to find correct warm-white colored LEDs at a reasonable price...most people probably want to change the color of their cluster perhaps so less demand for warm-white?
Yep, mine light up both sides of a 5 lane freeway now regardless of what lane my car is in, while staying below the rear-windows of other cars ahead of me since they're leveled right...it's amazing! Caesar told me far too many DIY jobs end up with them way off, and reassured me mine are just fine (thankfully!). Seeing the way the cutoff reflects on license plates/streets signs up ahead is fun too, gives it a little bluish glow.
Not sure what you're asking about the corners on the ground...if the wall were longer the light would slowly fade on both sides of that picture. Driving on the road have yet to encounter a scenario where it was wide enough to actually see that happen, on a freeway just can see the light along both side barriers.
On the ground, at the edge of the beam (just next to your car) I don't mean the range. Does it fade at the field of view or does it have a harsh angle? I love when HIDs are cut off super abruptly at their widest part.
Re reading this, I still don't think I've made it understandable so I made a shitty drawing -
So, is the light fading at the sides, or is it abrupt?
Offline
|
|
Site problems, bugs, or questions? Contact Administrator
All content copyright Saab92x.com 2005-2010
SAAB and the SAAB logos are trademarks of Saab Cars USA, Inc.

 Your Privacy Choices